A Better File System for Your Laser Engraving Business
A repeat order should be easy.
Instead, it often turns into a scavenger hunt through folders filled with files named final, final2, and final-final-use-this-one.
We learned that lesson firsthand.
A customer contacted us to replace a personalized whiskey glass we had engraved more than eight months earlier. The replacement glass was about 10–15% larger than the original, so we couldn't simply send the old file to the laser. The artwork needed to be resized and the engraving placement checked before production.
Fortunately, we had saved the original design, job notes, and production settings in an organized project folder. Instead of rebuilding the artwork from scratch, we opened the original files, made a few adjustments, confirmed the layout, and completed the order with confidence.
That's the real value of a good file system.
Whether you're running a full-time laser engraving business or creating products as a side hustle, an organized file system helps you complete repeat orders faster, reduce mistakes, and deliver consistent results.
The best part? You don't need expensive software or a complicated workflow. You just need a system you'll actually use.
Start With the Folder Structure You Already Have
Many laser businesses already organize projects by year and month, and that's an excellent foundation.
A simple structure might look like this:
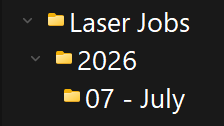
The problem starts when every project for the month gets dropped into that single folder.
Within a few weeks, it may contain:
- LightBurn project files
- Customer logos
- PDFs
- Photos
- Test engravings
- Mockups
- SVG files
- AI artwork
- Random screenshots
Finding the correct version months later becomes frustrating.
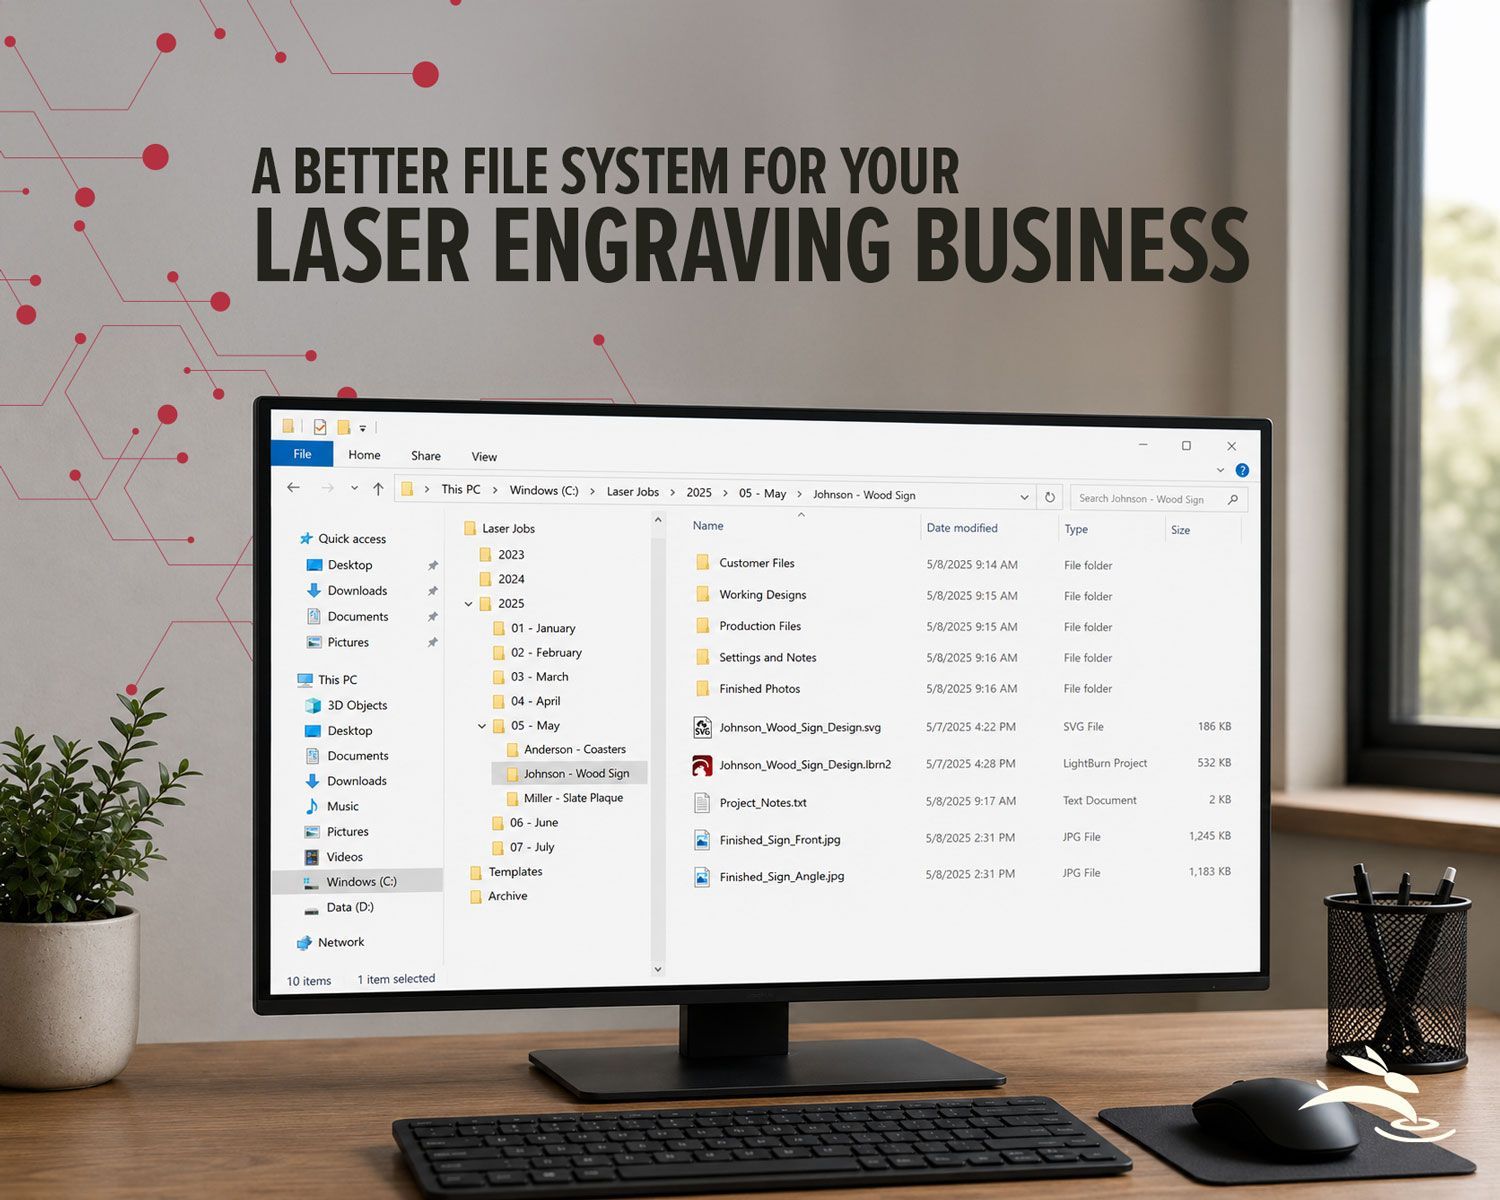
Instead of replacing your existing system, build on it.
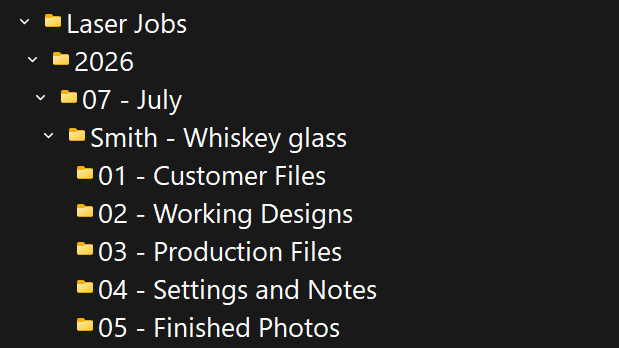
This keeps your jobs organized chronologically while giving every order its own workspace.
Give Every Order Its Own Project Folder
Every customer order deserves its own folder.
Months—or even years—from now, the folder name should immediately tell you what the project was without opening anything.
Good examples include:
-
Smith - Whiskey Glass -
Madison Schools - Teacher Tags -
Firefighters - Golf Outing Coasters -
Personal - Halloween Magnets
For customer work, include:
- Customer or organization name
- Product or project description
For personal projects, include:
- Event
- Product
- Purpose
Avoid vague folder names like:
-
Glass Project -
New Order -
July Job -
Random Stuff
They may make sense today, but they won't help when you're searching for a repeat order next year.
Separate Your Files by Purpose
One of the easiest ways to avoid production mistakes is to separate different file types instead of storing everything together.
Customer Files
Keep the original files exactly as the customer provided them whenever possible.
Examples include:
- Logos
- Photos
- PDFs
- Customer instructions
- Names and dates
- Reference images
Having untouched originals gives you a reliable starting point if edits go wrong.
Working Designs
This folder contains the editable versions of your design.
Examples include:
- Layout revisions
- Font changes
- Artwork cleanup
- Sizing adjustments
- Test versions
These files are works in progress and shouldn't be considered production-ready.
Production Files
Only place approved, tested files here.
Your production file should already contain:
- Correct dimensions
- Final positioning
- Approved artwork
- Verified laser settings
- Proper layers
Keeping production files separate helps prevent accidentally engraving an unfinished design.
Use File Names That Actually Mean Something
Your file name should tell you exactly what the project is before you open it.
A simple naming convention works well:
Customer_Project_Item_Date_Version
Example:
Smith_WhiskeyGlass_Name-Date_2026-07_v01.lbrn2
After making revisions:
Smith_WhiskeyGlass_Name-Date_2026-07_v02.lbrn2
For the approved production version:
Smith_WhiskeyGlass_Name-Date_2026-07_Production.lbrn2
Version numbers are far more reliable than naming files:
-
final.lbrn2 -
final2.lbrn2 -
final-new.lbrn2 -
final-fixed.lbrn2 -
final-final.lbrn2
Once every file is "final," none of them are.
Save the Information Your Design File Can't
The artwork is only part of the job.
Your LightBurn file doesn't necessarily record:
- Which laser was used
- Material brand
- Lens size
- Focus method
- Cleaning process
- Rotary setup
- Why one setting worked better than another
Create a simple text file inside your Settings and Notes folder.
Record information such as:
- Machine used
- Material
- Material thickness
- Lens
- Speed
- Power
- Number of passes
- Focus method
- Design dimensions
- Placement measurements
- Rotary settings
- Masking method
- Cleaning or finishing process
- Problems discovered during testing
You don't need an elaborate form.
A simple text document is enough.
Think of it as instructions for your future self.
Save a Photo of Every Finished Project
Photos answer questions that design files can't.
A finished project photo shows:
- Actual engraving placement
- Design size
- Material color
- Contrast
- Product orientation
- Alignment
- Overall appearance
This becomes especially valuable when products change between orders.
A replacement tumbler, whiskey glass, cutting board, or keychain may look identical while having different engraving dimensions.
Before every order leaves your shop, take at least one clear photo.
Use a descriptive filename such as:
Smith_WhiskeyGlass_Finished_2026-07.jpg
Future you will be glad you did.
Treat Saved Settings as a Starting Point
Saved settings save time—but they should never replace testing.
Materials can vary between:
- Manufacturers
- Suppliers
- Production batches
- Coatings
- Finishes
Even products with the same part number may engrave differently.
Our whiskey glass replacement is a perfect example.
The replacement glass was larger than the original, so we reused the artwork but verified the engraving area before production.
Before repeating an older project, confirm:
- Product dimensions
- Material thickness
- Engraving area
- Shape or taper
- Handle or seam location
- Customer-requested changes
- Material response
A two-minute test can save an expensive mistake.
Back Up Your Laser Files
An organized file system won't help if the files disappear.
Keeping every project on a single computer is risky.
Hard drives fail.
Laptops get damaged.
Files get deleted.
Protect your business by storing projects in at least two locations, such as:
- Primary work computer
- External backup drive
- Secure cloud storage
- Company server
Better yet, automate your backups whenever possible.
And remember:
A folder named "Backup" on the same computer isn't actually a backup.
Protect Customer Information
Good organization also means protecting customer data.
Avoid including unnecessary personal information in folder names or filenames.
Instead, keep only what's needed to identify the project.
Good practices include:
- Limit access to customer folders.
- Store customer approvals with each project.
- Verify names and spelling before engraving.
- Save approved artwork.
- Confirm permission before reproducing copyrighted logos.
- Remove sensitive files when they're no longer needed.
- Use secure cloud storage and strong passwords.
These habits protect both your customers and your business.
Don't Try to Reorganize Everything at Once
If you've accumulated years of messy folders, don't feel like you have to fix everything this weekend.
Start with your next order.
Create a clean project folder.
Separate:
- Customer files
- Working designs
- Production files
- Notes
- Photos
Then repeat the process for every new project.
When an old customer comes back, organize that project while you're already working on it.
Over time, your archive becomes cleaner without requiring one massive cleanup.
Frequently Asked Questions About Laser Engraving File Organization
What is the best way to organize laser engraving files?
A simple folder structure works well for most laser businesses. Organize projects by year and month, then create a separate folder for each customer order. Within each project folder, keep original customer files, working designs, production files, job notes, and finished photos in their own subfolders. This makes repeat orders much easier to find and manage.
Should I keep every laser engraving project?
If storage space allows, it's usually worth keeping completed projects, especially for repeat customers or personalized products. Past files can save hours of redesign work and help maintain consistency when customers reorder months or even years later. Be sure to follow your business's data retention policy and remove sensitive information when it is no longer needed.
How should I name my LightBurn files?
Use descriptive file names that include the customer name, project, date, and version number. For example:
Smith_WhiskeyGlass_Name-Date_2026-07_v01.lbrn2
Once a file has been tested and approved, save a production version with a clear name, such as:
Smith_WhiskeyGlass_Name-Date_2026-07_Production.lbrn2
Avoid using names like final, final2, or new file, which quickly become confusing.
Should I save my laser settings for every project?
Yes. Recording your speed, power, material, lens, rotary settings, and other production notes creates a valuable reference for future jobs. While settings should always be verified with a test piece, having previous notes provides an excellent starting point and reduces setup time.
Why should I save photos of completed laser projects?
Finished photos document engraving placement, size, alignment, and the final appearance of the product. They're especially useful when customers request replacements or reorder items that may have slightly different dimensions or finishes than the originals.
What's the best way to back up laser engraving files?
Follow the 3-2-1 backup rule whenever possible:
- Keep three copies of your files.
- Store them on two different types of media, such as your computer and an external drive.
- Keep one copy off-site, such as in secure cloud storage.
Automated backups are more reliable than manually copying files from time to time.
Title or Can file organization improve customer service?
Absolutely. An organized file system allows you to locate artwork, customer approvals, production settings, and finished photos quickly. That means faster turnaround times for repeat orders, fewer production mistakes, and a more professional experience for your customers.
What information should I keep with each laser engraving project?
In addition to your design files, consider saving:
- Customer artwork and instructions
- Editable design files
- Final production files
- Material and laser settings
- Product dimensions
- Placement measurements
- Customer approvals
- Finished project photos
- Notes about any challenges or adjustments made during production
Keeping everything together creates a complete project record that can save significant time on future orders.
Better Organization Leads to Better Customer Service
A good file system does far more than keep your computer organized.
It helps you:
- Complete repeat orders faster
- Reduce production mistakes
- Produce more consistent results
- Train employees more easily
- Find customer approvals quickly
- Troubleshoot previous jobs
- Protect valuable artwork
- Preserve proven laser settings
- Deliver a better customer experience
The best file system isn't the most complicated one.
It's the one your entire team will actually use.
Start with your year-and-month folders.
Give every project its own home.
Save your original files, production files, notes, and finished photos together.
You'll spend a few extra minutes organizing each project today—but you'll save hours the next time a customer asks for "the exact same thing" months or even years later.