Blog Layout

hand tracing an image of a wolf

How to Trace Images in LightBurn Software

Are you looking to enhance your designs with intricate details? Learning how to trace images within LightBurn software can elevate your creative projects to new heights. LightBurn offers powerful tools for vectorizing images, allowing you to convert raster graphics into editable vector paths. Let's dive into the process step by step to unlock the full potential of your designs.


Understanding Image Tracing


Before we delve into the specifics, it's essential to grasp the concept of image tracing. Image tracing involves converting bitmap images, also known as raster graphics, into vector graphics. Unlike raster graphics, which are composed of pixels and can become pixelated when resized, vector graphics are composed of scalable paths defined by mathematical equations. This scalability makes vector graphics ideal for various applications, including laser cutting, engraving, and graphic design.


Importing Your Image


The first step in tracing an image within LightBurn is to import your desired image into the software. LightBurn supports a wide range of file formats, including JPEG, PNG, BMP, SVG, and more. Simply navigate to the "File" menu, select "Import," and choose your image file from your computer's storage. Once imported, your image will appear on the LightBurn workspace, ready for tracing.


Tracing Your Image


Now that your image is imported, it's time to trace it using LightBurn's tracing tools. You can access the "Trace Image" tool in two ways:

  1. Right-click on your imported image within the LightBurn workspace.
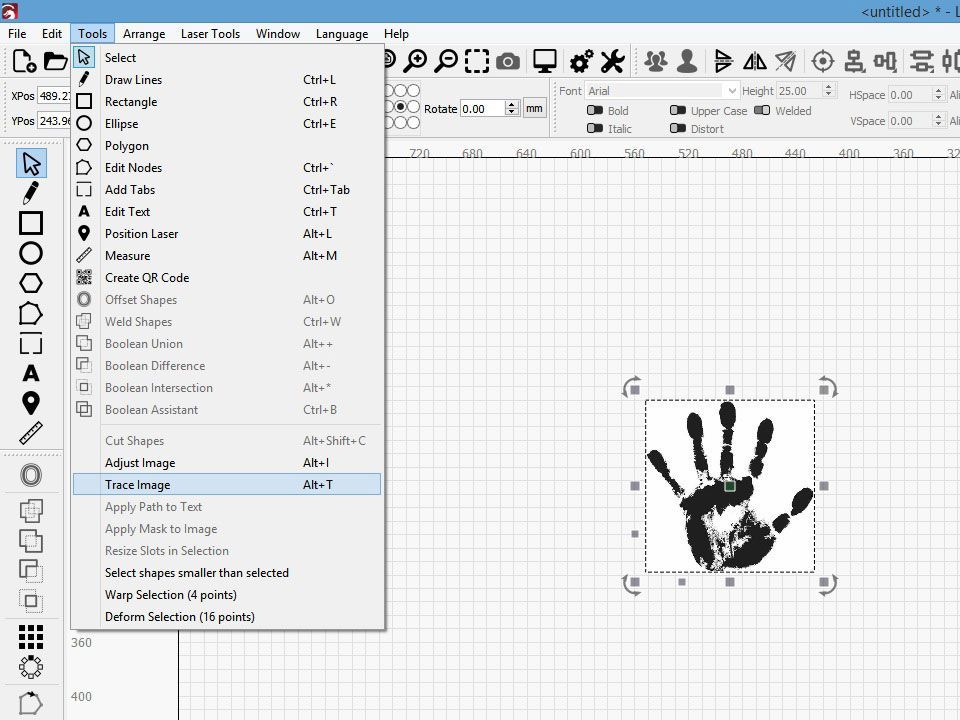
  2. Navigate to the "Tools" menu and select "Trace Image." This action will also open the Trace Image dialog box, where you can adjust various settings to achieve the desired tracing result.
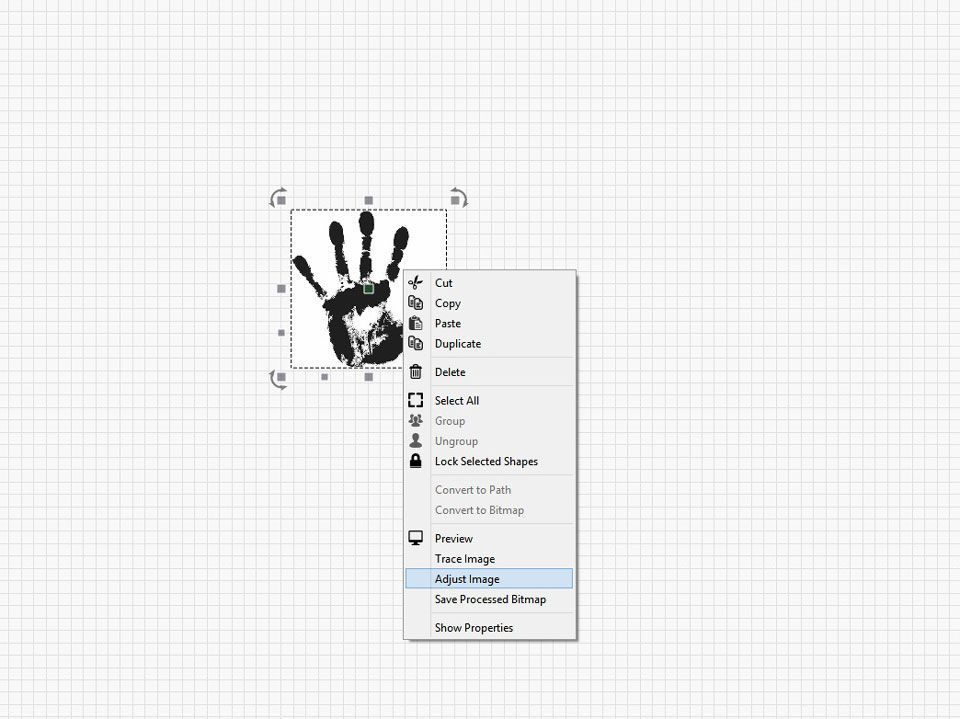
screenshot of right-click menu
screenshot of the menu through tools on toolbar

Adjusting Trace Settings


LightBurn provides several options for customizing the tracing process to suit your specific needs. You can adjust parameters such as threshold, brightness cutoff, and smoothing to fine-tune the tracing outcome. Experimenting with these settings allows you to achieve optimal results based on the complexity and clarity of your image.
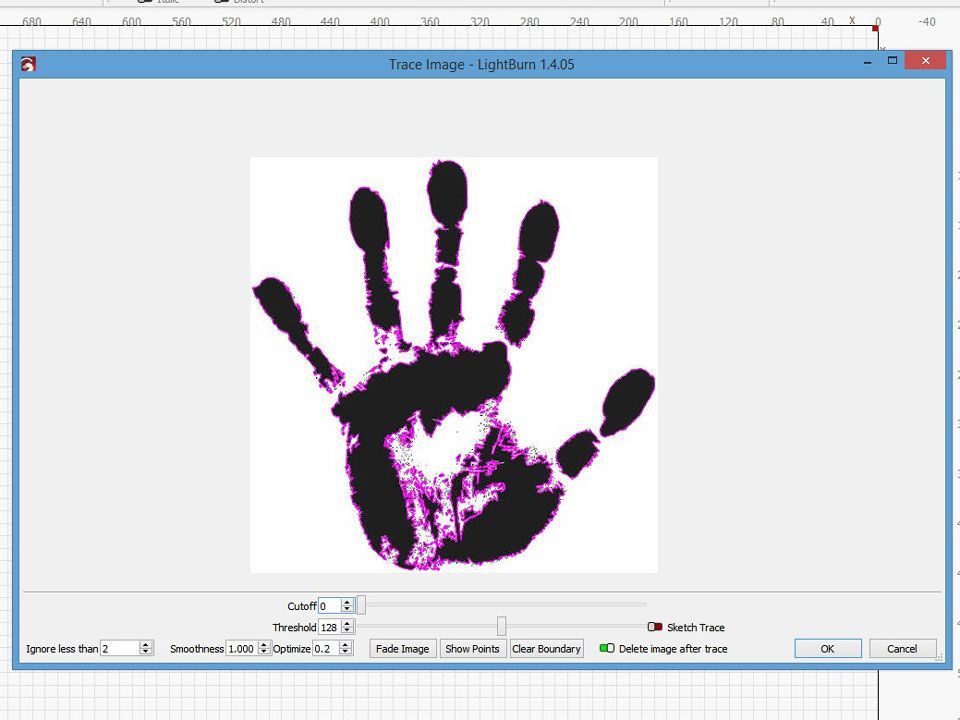
hand print image traced on lightburn software

Previewing and Refining


After adjusting the trace settings, take advantage of LightBurn's preview feature to assess the tracing outcome before finalizing it. The preview allows you to visualize how the traced image will appear, enabling you to make further refinements if necessary. You can adjust settings on the fly and preview the changes in real time until you're satisfied with the result.


Converting to Vector Paths


Once you're happy with the traced image preview, it's time to convert it into vector paths. Click the "Trace" button to initiate the tracing process. LightBurn will convert the raster image into editable vector paths based on your specified settings, resulting in a vectorized version of your original image.


Editing and Customizing


With your image successfully traced and converted into vector paths, you now have full control over editing and customizing it to your liking. LightBurn provides a range of editing tools for manipulating vector objects, including node editing, shaping, and resizing. You can further enhance your design by adding text, adjusting colors, and incorporating additional elements.


Conclusion


Mastering the art of tracing images within LightBurn opens up a world of creative possibilities for your projects. Whether you're a graphic designer, maker, or hobbyist, understanding how to effectively trace images allows you to unleash your creativity and produce stunning results. By following the steps outlined in this guide and experimenting with LightBurn's tracing tools, you'll be on your way to creating intricate designs with ease. 🐰


Headline Text with Rainbow Colored wood slats as background
by Rod Boehm 03 May, 2024
Unlock the full potential of your laser cutting/engraving machine with Rabbit Laser USA's expert guide! Discover 10 innovative projects, from personalized gifts to business ventures, in this SEO-optimized article. Start creating unique items today!
by Rod Boehm 30 Apr, 2024
Discover the crucial role of focal lens size in fiber laser marking machines. From achieving precision and clarity to optimizing marking speed, find out how the right lens size can revolutionize your engraving projects. Learn how to strike the perfect balance between speed and detail for seamless results. Dive into applications across industries and uncover the secrets to driving innovation forward with precision optics. Unlock the full potential of your laser engraver today!
desk with paper coffee and plant
by Rod Boehm 26 Apr, 2024
Unlock the potential of your laser engraving and cutting business with digital mockups. Enhance customer engagement, boost sales, and stand out from the competition. Discover how integrating digital mockups can revolutionize your sales strategy today!
blog cover close up of laser head with title of blog
by Rod Boehm 23 Apr, 2024
Unlock the full potential of laser cutting with these 5 pro tips! From choosing the right materials to perfecting your laser settings, this guide will help you achieve precision and efficiency in your projects. Safety measures and maintenance tips included. Start cutting like a pro today!
An illustrated hand grasping a laser beam with title text
by Rod Boehm 17 Apr, 2024
Discover the power and precision of Ruida controllers for CO2 laser machines. Explore advanced features, seamless integration, and intuitive user interface for enhanced laser cutting and engraving experiences. With Ruida, unlock industrial-grade functionality and unleash the full potential of your CO2 laser system.
by Rod Boehm 12 Apr, 2024
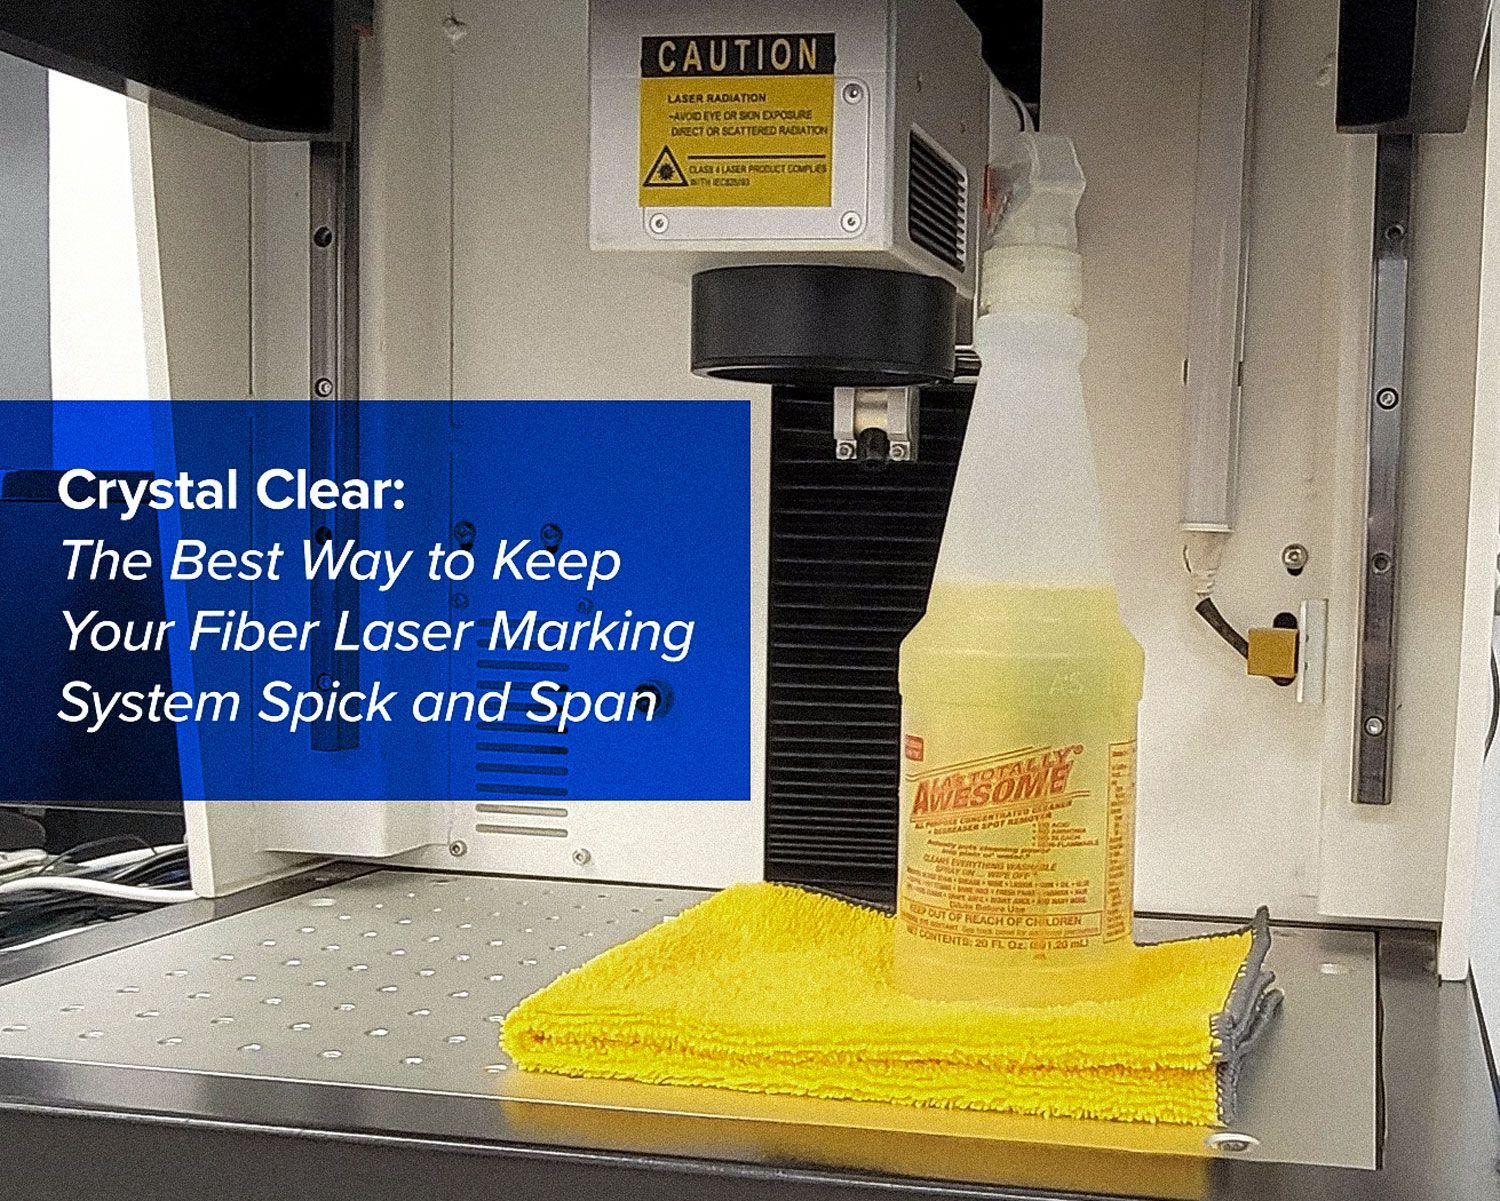
Crystal Clear: The Best Way to Keep Your Fiber Laser Marking System Spick and Span Hey there! Got a sec to chat about keeping your fiber laser marking system in tip-top shape? Let's dive in! Safety First, Always Okay, before we get into the nitty-gritty of cleaning, let's make sure we're all safe and sound. Power down that bad boy and let it cool off completely. Oh, and don't forget your safety gear – gloves and goggles are a must! Spruce Up the Outside Grab a soft cloth and give the exterior of your fiber laser marking system a good wipe-down. We're talking about getting rid of all that dust and grime that's been hanging out. And pay extra attention to those vents – we don't want any overheating mishaps! Clear Up Those Optics Now, onto the optics – the real MVPs of your marking system. Bust out those lens wipes and cleaning solutions recommended by the manufacturer. Gently does it – we don't want any scratches on those delicate surfaces. Tidy Up Your Workspace Take a look around your workspace – any clutter getting in the way? Clear it out! You want a clean, tidy area to work in. Sweep up any debris and keep things spic and span. Don't Forget the Air Filtration Let's show some love to the air filtration system. Check those filters and swap them out when needed. And hey, don't neglect those vents – give 'em a good clean to keep that airflow going strong. Keep an Eye Out Make a habit of giving your marking system a once-over regularly. Spot any wear and tear? Fix it up before it becomes a bigger problem. And a little lubrication here and there never hurt anyone! Spread the Knowledge Got all these cleaning tips down? Awesome! Share the love with your team. Document the process and make sure everyone's on the same page. Oh, and don't forget to update that manual whenever there's something new to add! In Conclusion With a little TLC, your fiber laser marking system will be running like a dream for years to come. So, take the time to give it some love – you'll thank yourself later when you're cranking out those crystal-clear markings without a hitch! 🐰
Headline with photo of  a keyboard
by Rod Boehm 09 Apr, 2024
Unlock the magic of LightBurn's Move Increments! Discover how these precise movement controls can streamline your design process and enhance your creativity. Learn about default and customizable move increments, and find out how they can improve your laser cutting and 3D printing projects. Download LightBurn now and take your design skills to the next level!
by Rod Boehm 02 Apr, 2024
Unlock the secrets of DPI in laser engraving! Dive into our comprehensive guide to understand how dots per inch (DPI) can take your creations from pixelated to perfection. With friendly banter, relatable anecdotes, and practical tips, we'll help you find the optimal DPI setting for your next engraving project. Let's turn your ideas into stunning works of art – one dot at a time!
by Rod Boehm 27 Mar, 2024
Uncover the hidden truths behind laser machine retailers who utilize drop shipping in this informative article. Learn about the benefits and risks associated with this practice, and discover how to protect yourself as a consumer. Stay informed to avoid getting burned by subpar products and shipping delays.
by Rod Boehm 22 Mar, 2024
Discover the crucial role of air-assist technology in optimizing laser engraving/cutting processes. Learn how air-assist enhances visibility, prevents material damage, and ensures consistent quality. Explore maintenance tips and real-world applications to maximize performance and efficiency.
by Rod Boehm 20 Mar, 2024
Dive into our comprehensive guide on focal lenses for laser cutting and engraving. Learn the differences between larger and smaller focal lengths, and discover how they impact cutting depth, precision, and versatility in your laser projects.
Comic Style title
by Rod Boehm 15 Mar, 2024
When considering laser engraving rotaries, the choice between roller and chuck options significantly impacts precision and efficiency. Roller rotaries offer versatility, stability, and quick setup times, making them ideal for various cylindrical objects. On the other hand, chuck rotaries provide a secure grip and exceptional precision, especially for intricate designs. Understanding these differences aids in selecting the right rotary for specific engraving needs, maximizing productivity and quality.
More posts
Share by: